I mentioned a while ago that I’m a member of Wayfair’s Home Expert programme (still feeling pretty excited about that!) and this month Wayfair challenged me to create a gallery wall in our home in collaboration with the Art Group. I got to choose three of my favourite prints from the Art Group and incorporate them in my new gallery wall. I also got to pick few extra prints from Wayfair to complete the wall. Honestly, this challenge couldn’t have arrived at a better time and I’ll explain to you why very soon.
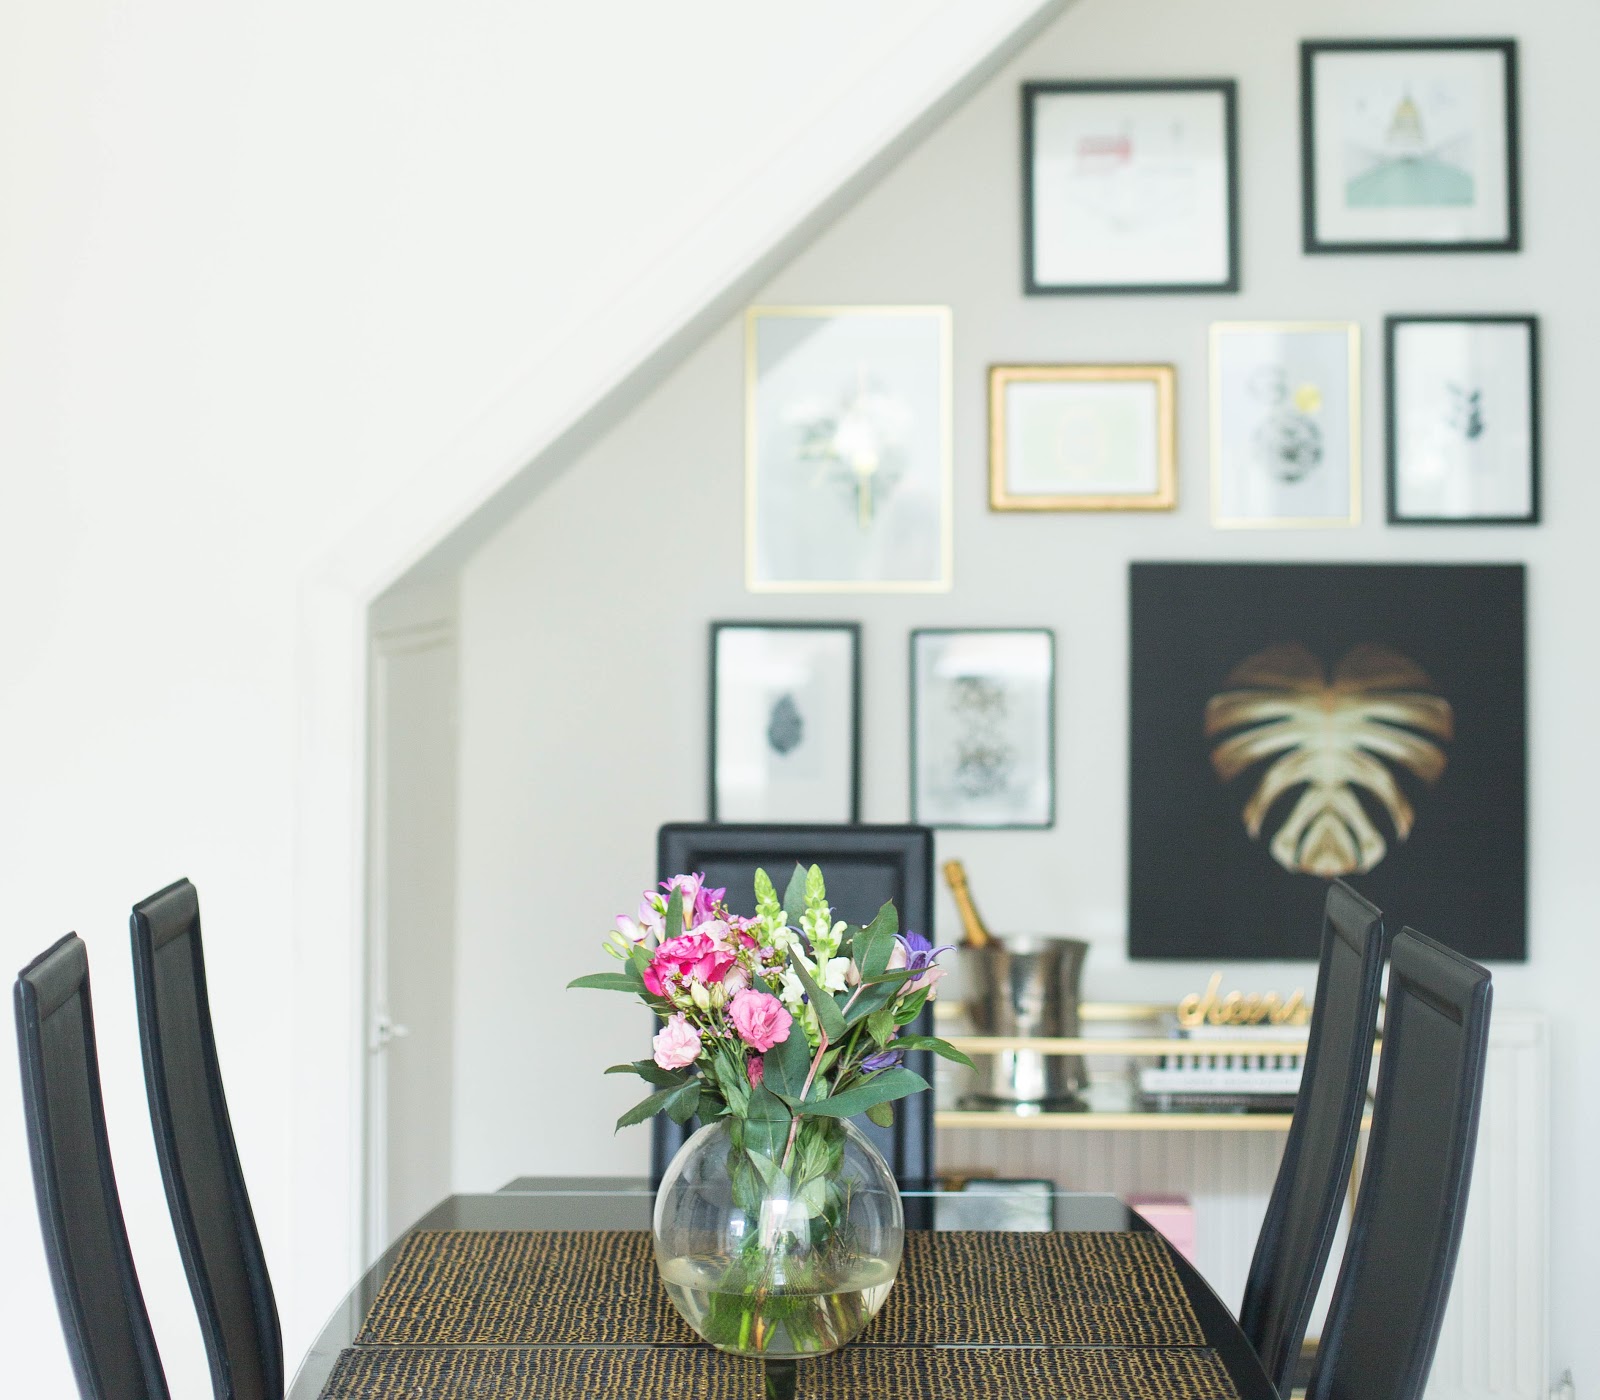
Everyone seems to be into gallery walls at the moment. They are all over interior magazines and Pinterest and there’s literally no escaping from them. Luckily I’m a big fan of them too. We have two gallery walls upstairs but I felt we really needed one downstairs as well. I find gallery walls incredibly mesmerising and I could stare at them forever. They tell a lot about the person living in the house too which is why I think they are particularly addictive. I didn’t want this gallery wall to be too symmetrical but it had to go well with our colour scheme and the overall feel of our dining room. You probably know how obsessed I am with monochrome décor and gold accessories. Well, let’s just say it was easy to pick the colour scheme for our gallery wall too!
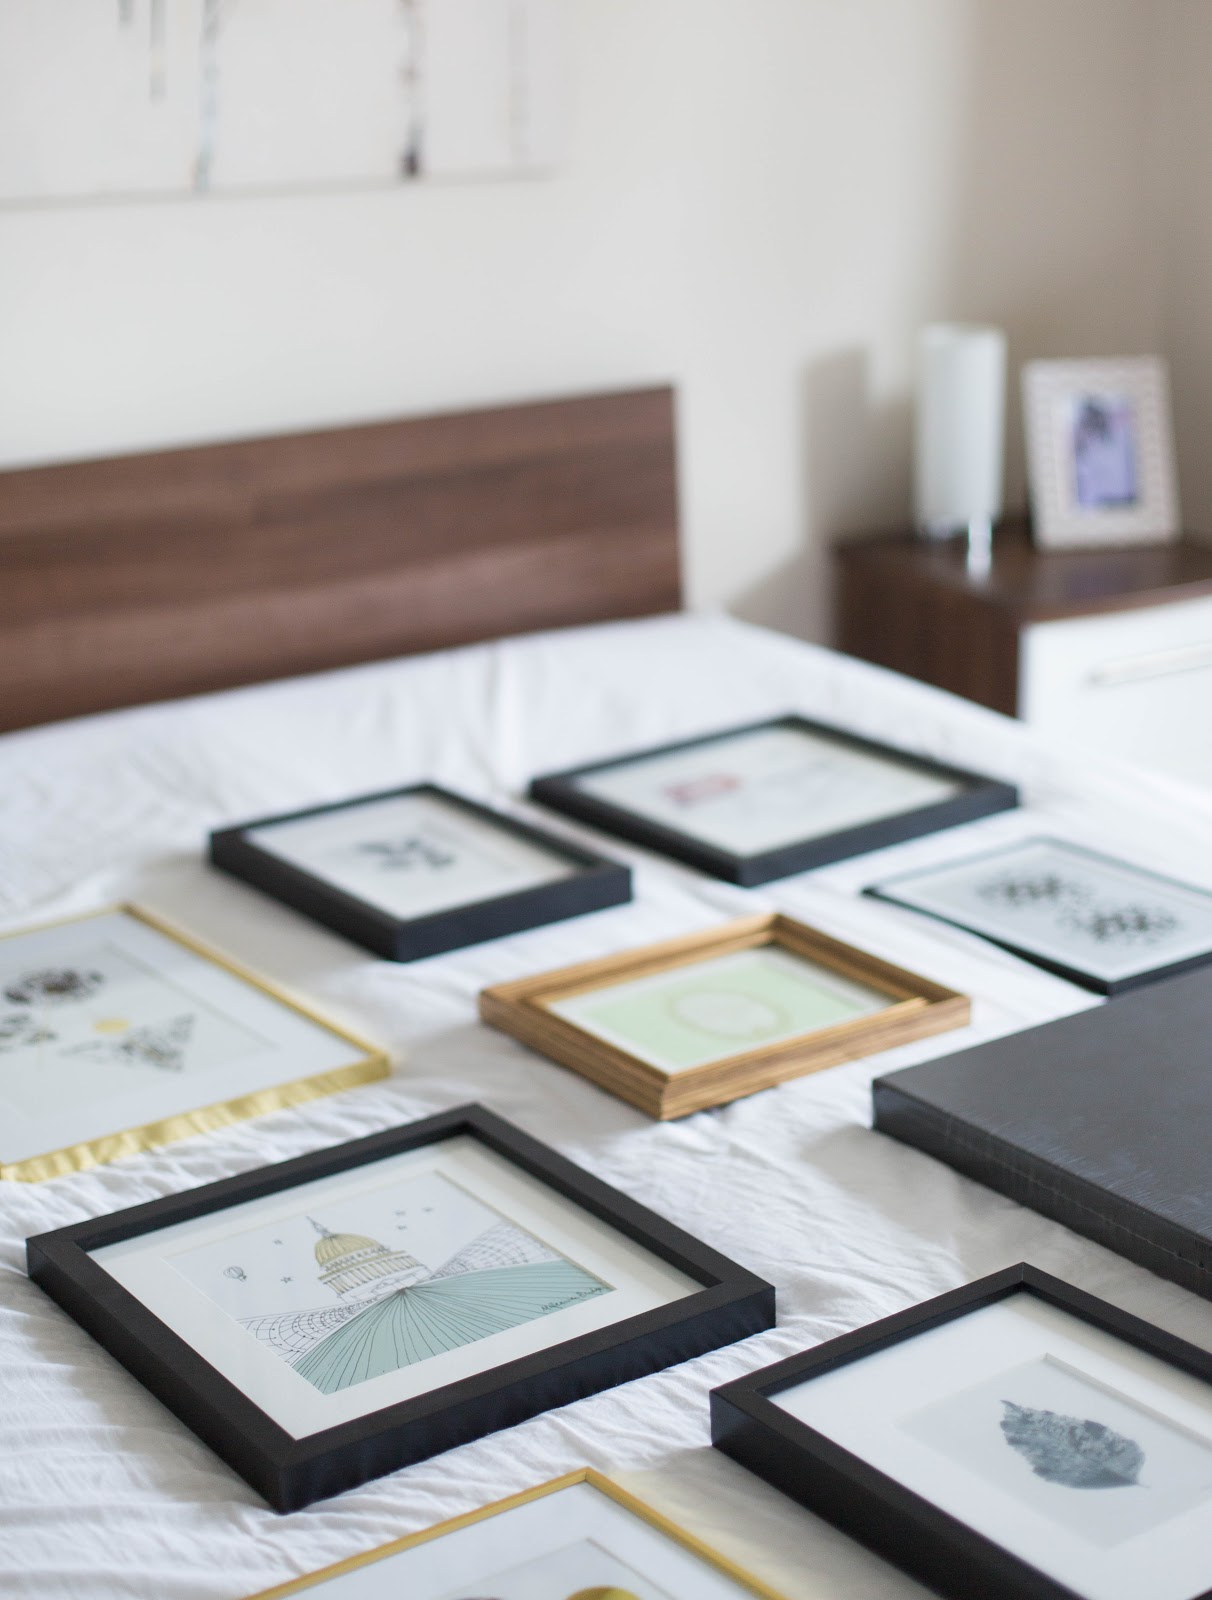
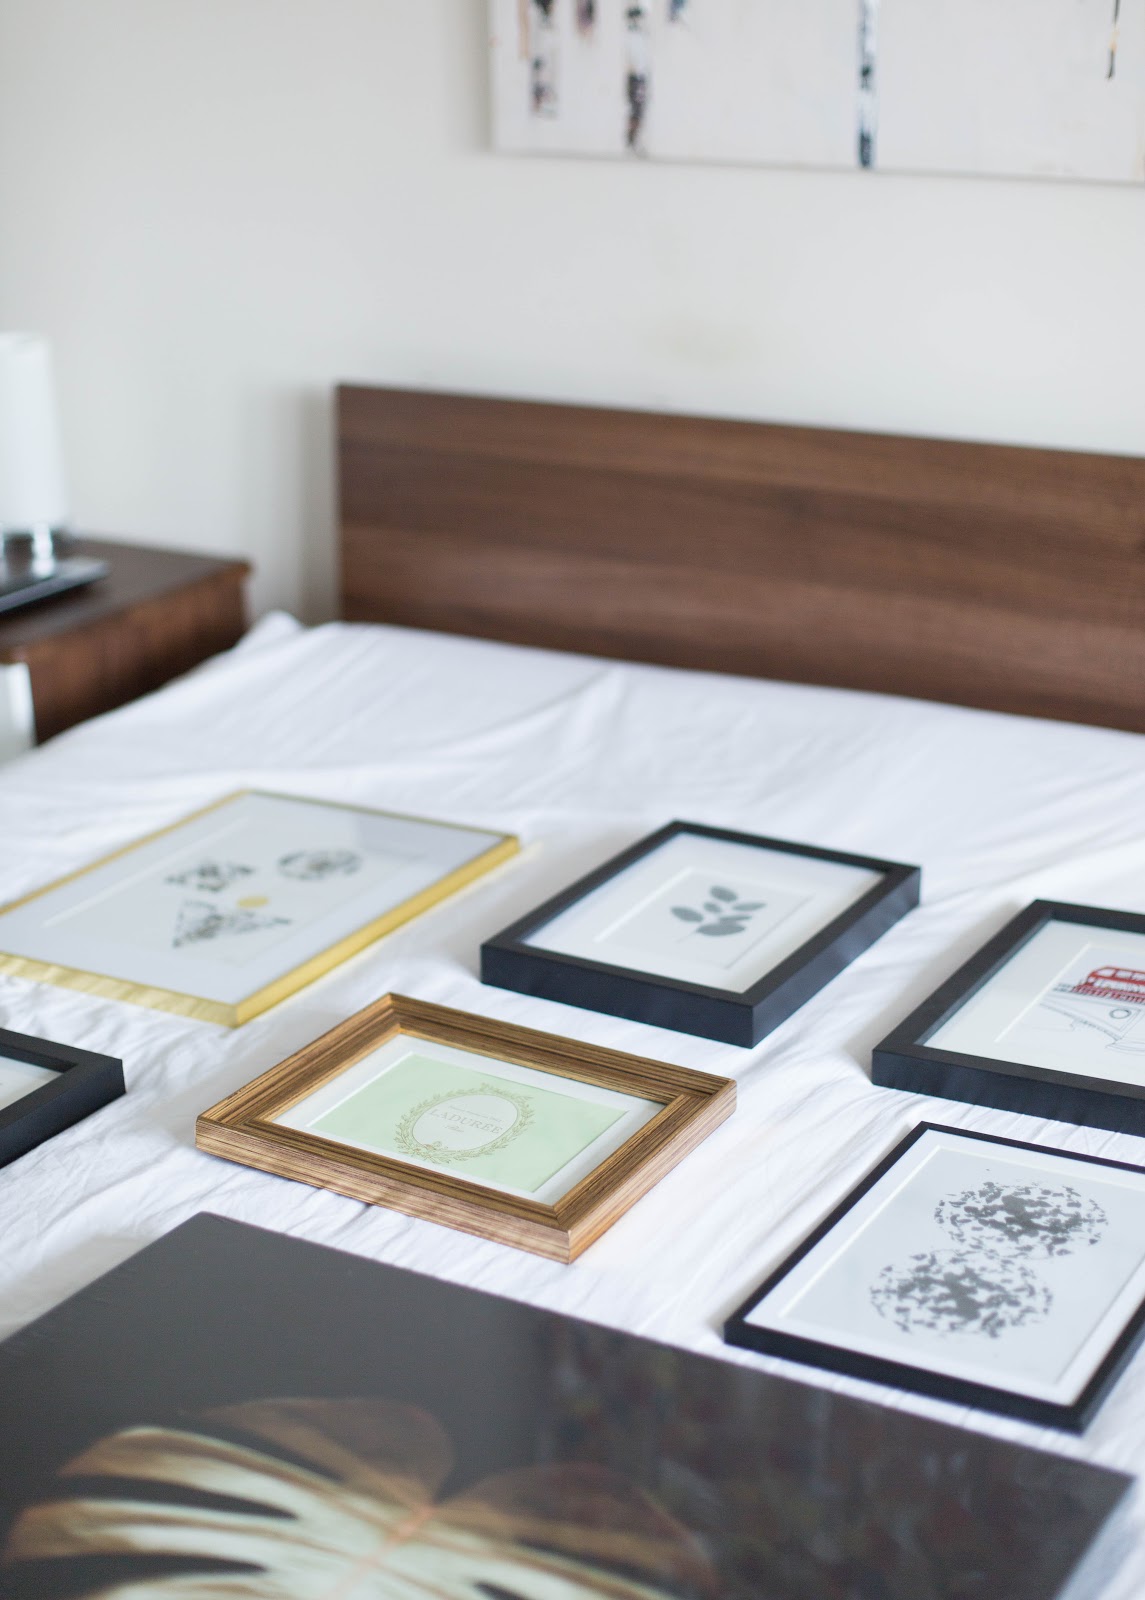
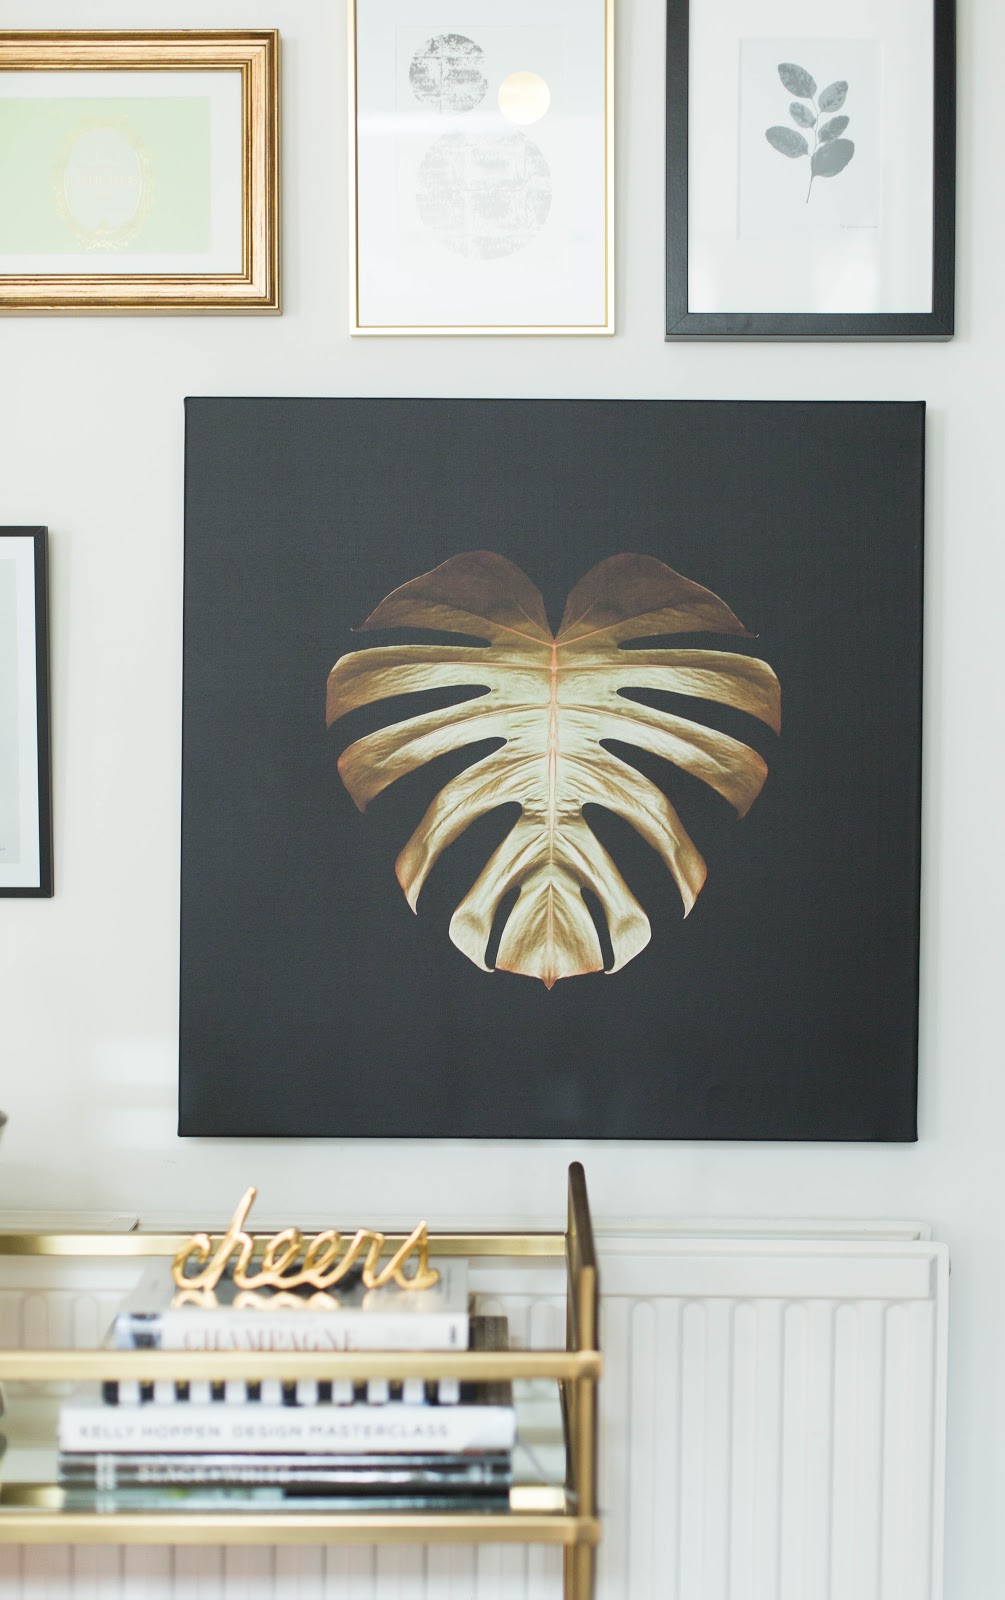
I created a little mood board in Photoshop before I ordered the art because I wanted to be 100% certain with my selection. I also think it’s really important to put all the art on a flat surface, like bed or a floor, so you can really see what they are going to look like on the wall. I placed the largest art piece, the gold palm canvas, on the right side, avoiding the middle section so it wouldn’t dominate the entire wall. I made sure that the second largest print was on the left side, just to balance things out. Then I just kind of played around with all the other prints to see which layout was visually most appealing. I think I must have spent half a day reshuffling them until I was happy.
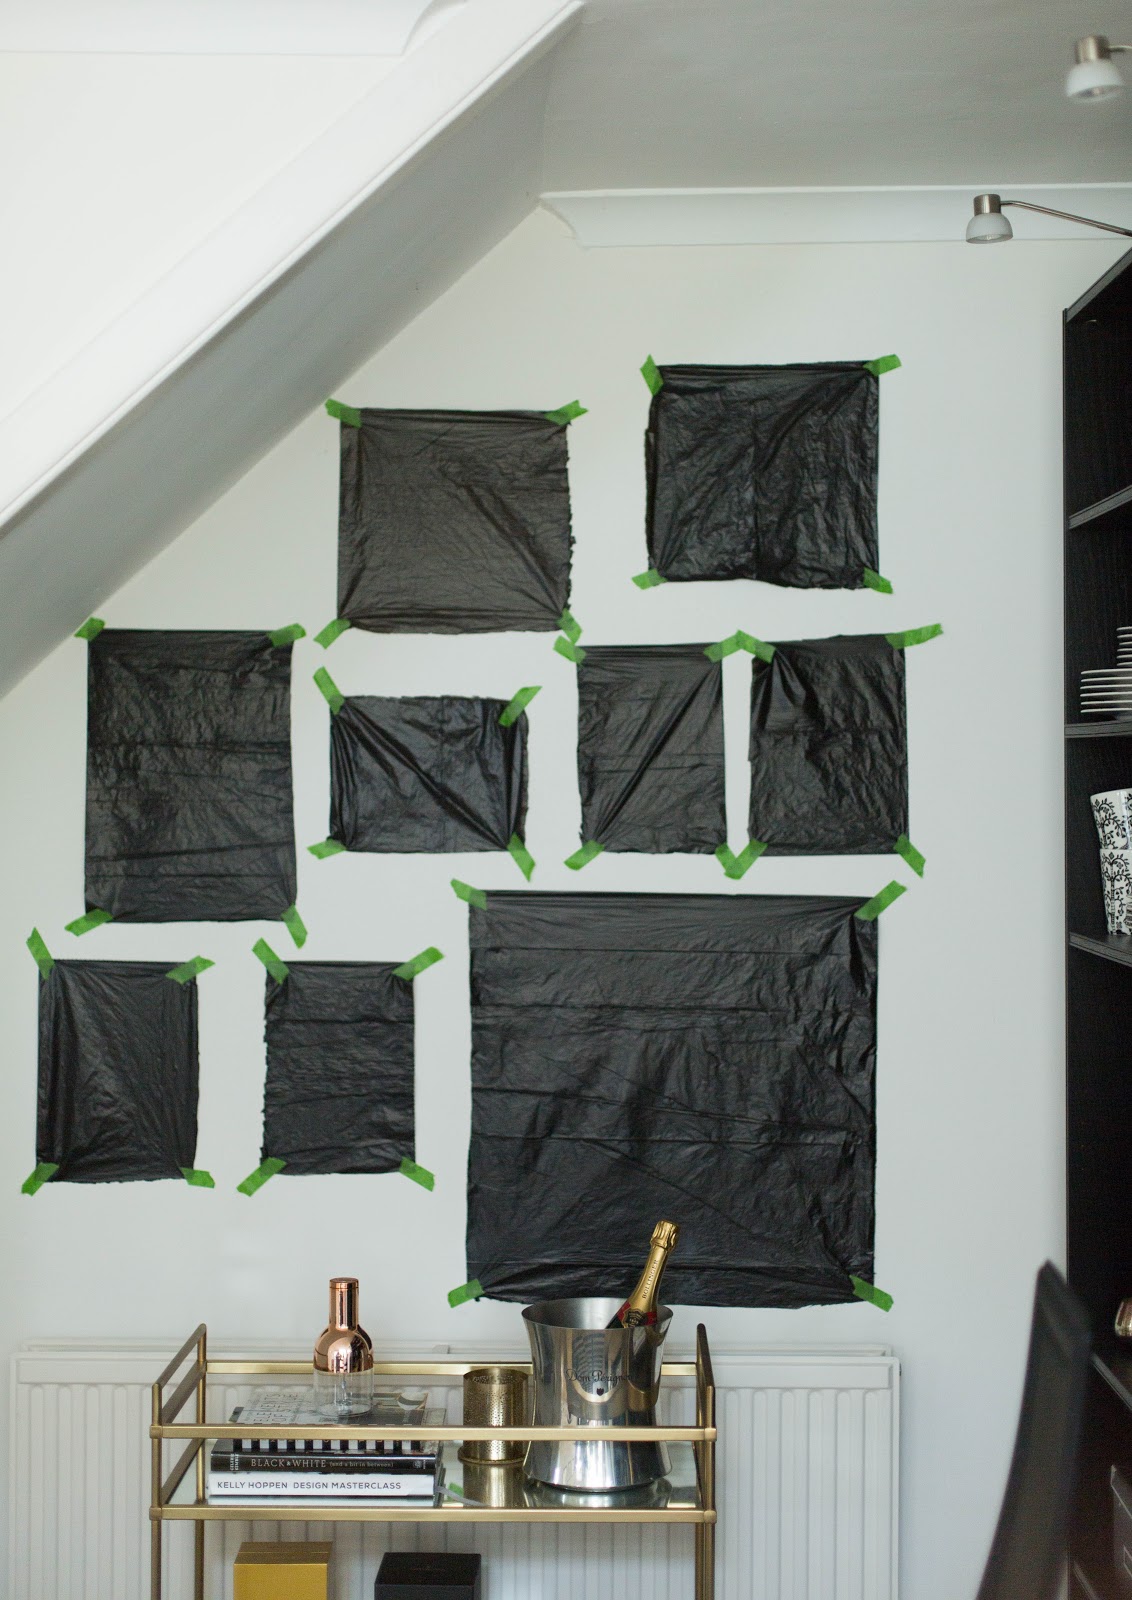
Then I made some cutouts from bin bags. Classy I know, but they totally do the job. I placed them up on the wall so that I could see where each print would go, which also came pretty handy in the hanging part. Luckily my husband volunteered to hang them up (well he didn’t really have a choice, did he?) and we used adhesive hooks and strips for all the other prints except the large gold frame which was too heavy.
So the reason why this challenge couldn’t have arrived at a better time is because I actually had a big blank wall in my dining room. In fact, I’ve had a big blank wall in my dining room for 6 years now. I’m kind of ashamed to admit it, considering I’m an interior blogger and all, but I just couldn’t decide what to put up there. Also, we used to store baby equipment in this corner but now that my youngest daughter has grown out of them, I’m so glad to see them go and I can’t wait to make this room feel a bit more grown up and glamorous.

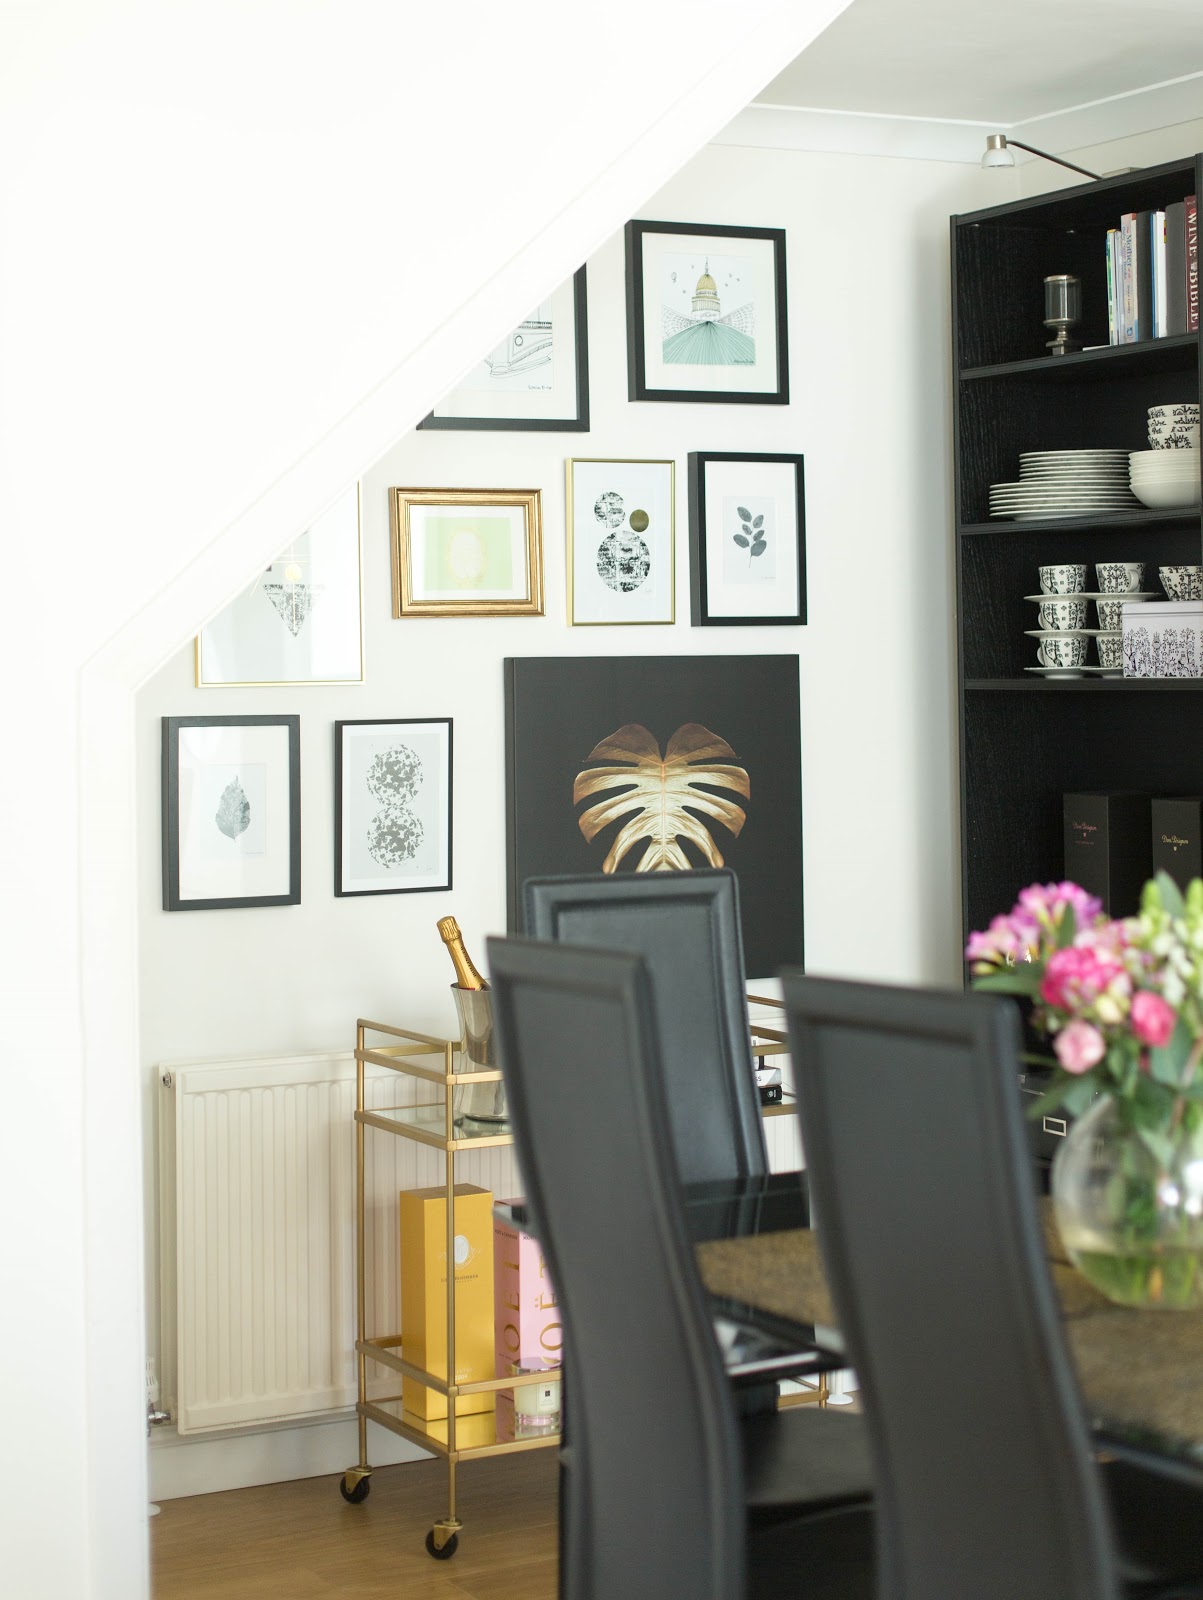
So here’s the big reveal! What a difference, right? I’m so pleased with the outcome. Our new gallery wall has glammed up our dining room beyond my wildest dreams. The Gold Palm Canvas was a bit of a risk but I love the fact it’s big and bold as this room really needed bit of oomph. I also wanted to make the wall a bit more personal and these London cityscape prints (London II and London III by Susie Brooks) by Art Group caught my eye immediately. I didn’t want it to be all monochrome either so when I spotted the gold framed prints (NY Framed Graphic & Everyday 2016 Illustration) from House Docktor I knew they’d go perfectly with our glamorous gallery wall. The Fika Print completes the wall nicely. I love abstract art and our gallery wall totally reflects that. I also added some of my old framed prints to the gallery wall but I only used 9 art pieces in total.


Tips!1. If you’re going for an unsymmetrical gallery wall mix at least 3-4 different types of frames/art to give it a collected look.
2. Preparation is everything. If you want to be 100% happy with your wall use Photoshop (or any similar software) to create a mood board first and then place the art on a flat surface like floor or bed before hanging it up.
3. Use cutouts from bin bags to help you visualise what the wall is going to look like. This will be especially handy in the hanging part. Remember to use painters masking tape so the tape doesn’t damage the paint work on your wall.
4. Don’t be afraid to go for one statement piece that’s bigger than the rest.
5. Don’t over think it. Trust your instincts and have fun with it!
Our dining room feels so much more glamorous now thanks to our new gallery wall but I have a feeling I’ll be adding more art to it at some stage. I don’t think gallery walls are truly ever finished. Next I’d like to add some smaller prints or wall ornaments to our wall display and I cannot wait to see how it will evolve with time.
I’d love to know what you think! Are you a fan of gallery walls?
*This post was sponsored by Wayfair. However, all thoughts and opinions are my own as usual.


I love the gold palm it is so cool and what a great idea to mark out with bin bags, the finished look is so great x
Thank you so much Sarah! I was a little worried how it was going to turn out (the black canvas is so dominating) but in the end I think they all work together quite nicely 🙂 x
Well done! I wanted to do something like this on the huge expanse of bare wall we have in our lounge but I was chicken!!! Thanks for helping to demystify and for the tips!
Thanks so much Jane! I still have another (somewhat) bare wall in our living room that I need to do something about. Good luck with yours! I'm sure it will be fab 🙂 x
This looks amazing, I love gallery walls but am so rubbish at collating them. Thank you for the tips that will definitely come in handy X
Thank you so much Lins! I'm glad you found it useful 🙂 x
You've done an amazing job mixing up the designs here and they all compliment each other so well. I love the big gold leaf and was swayed by that a few times when looking through the collections! x
Thanks so much Hannah! The big gold leaf was a risk but I think it paid off in the end 🙂 x